Have you ever wondered how to power your electric scooter for awesome rides? Imagine zooming down the street, feeling the wind in your hair. The secret often lies in how you wire a 24v battery for it. Proper wiring can make all the difference!
Wiring your electric scooter may sound tricky. But don’t worry! It’s simpler than you might think. Many people enjoy tinkering with their scooters to boost performance. Plus, it’s a fun project that teaches you something new!
Did you know that using the right battery setup can make your scooter faster and last longer? By understanding the basics of wiring, you can create a stronger connection. This guide will help you grasp how to wire a 24v battery step by step.
Ready to dive in? Let’s learn how to make your electric scooter even more exciting with a well-wired battery!
How To Wire A 24V Battery For An Electric Scooter Guide

How to Wire a 24V Battery for an Electric Scooter
Wiring a 24V battery for your electric scooter can seem tricky, but it’s not! Start by gathering your tools: wires, connectors, and a multimeter. Next, connect the battery’s positive terminal to your scooter’s controller. Don’t forget to attach the negative terminal too. Curious about safety? Always double-check your connections. A fun fact: Proper wiring can extend your battery’s life! So, dive in and give your scooter the power it needs to zoom ahead!
Understanding the Basics of Electric Scooter Wiring
Explanation of electric scooter components and their functions. Importance of proper wiring for safety and efficiency.
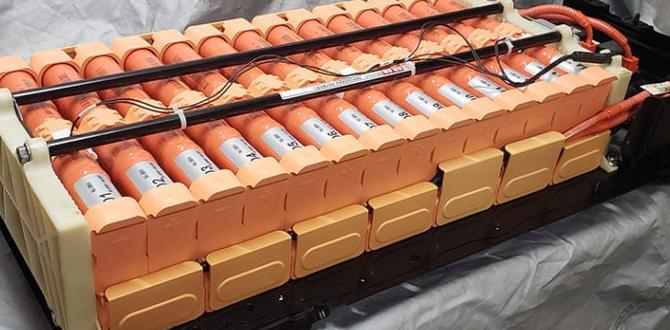
Electric scooters have several key parts that help them run smoothly. These include the battery, motor, controller, and throttle. The battery stores energy. The motor pushes the scooter forward. The controller manages power flow. Finally, the throttle lets you control the speed.
Wiring connects all these parts. Proper wiring is crucial. It ensures safety and allows your scooter to work efficiently. Poor connections can cause problems. Make sure everything is tight and secure.
What happens if the wiring is wrong?
If the wiring is wrong, the scooter might not start or could even catch fire. Safe and correct wiring prevents accidents and helps your scooter last longer.
Here are some wiring safety tips:
- Use the right gauge wire.
- Check connections regularly.
- Insulate exposed wires.
- Follow the scooter’s manual.
Choosing the Right 24V Battery for Your Electric Scooter
Types of 24V batteries available (lithiumion, leadacid, etc.). Factors to consider when selecting a battery (capacity, weight, size).
Picking the best 24V battery for your electric scooter is not rocket science, but it can feel like it! There are mainly two types: lithium-ion and lead-acid. Lithium-ion batteries are lighter and hold a charge longer, while lead-acid ones are heavier but cheaper. When choosing, think about capacity, weight, and size. A heavy battery might make your scooter feel like a turtle! Here’s a quick comparison:
| Battery Type | Weight | Capacity | Price |
|---|---|---|---|
| Lithium-ion | Light | High | More expensive |
| Lead-acid | Heavy | Lower | Cheaper |
Consider your scooter’s needs. Remember, a good battery means more fun rides! So choose wisely, and maybe skip leg day at the gym!
Tools and Materials Needed for Wiring
List of essential tools (wire stripper, soldering iron, connectors, etc.). Recommended materials (wires, fuses, heat shrink tubing).
Before diving into the exciting world of wiring, gather your tools! You’ll need a few essentials, like a wire stripper to peel off insulation faster than a banana, a soldering iron for fusing connections (this baby gets hot!), and connectors to hold everything together. Don’t forget the materials, too. Quality wires, fuses to prevent surprises, and heat shrink tubing to keep your work neat and tidy are must-haves. Ready? Let’s check this list!
| Tools | Materials |
|---|---|
| Wire Stripper | Wires |
| Soldering Iron | Fuses |
| Connectors | Heat Shrink Tubing |
Step-by-Step Guide to Wiring a 24V Battery
Detailed instructions on connecting the battery to the controller. Diagrams or illustrations for visual assistance.
Wiring a 24v battery to an electric scooter might sound tough, but it can be as easy as pie! First, connect the positive terminal of your battery to the controller. Then, do the same with the negative terminal. It’s like giving your scooter a power hug! For extra help, check out the diagram below. It shows where each wire goes. Remember, safety first! Double-check everything before turning it on. You wouldn’t want your scooter to fly away, right?
| Connection | Battery Terminal | Controller Terminal |
|---|---|---|
| Positive | Red | Positive (+) |
| Negative | Black | Negative (-) |
Quick tip: Always wear gloves. You don’t want battery acid in your spaghetti dinner!
Safety Precautions When Wiring Your Electric Scooter
Importance of disconnecting power before starting. Tips to avoid short circuits and electrical hazards.
Before you dive into wiring, it’s important to play it safe. First, always disconnect the power from your electric scooter. Trust us, no one wants a surprise zap! Short circuits can be more dramatic than your favorite superhero movie. To avoid them, double-check wires for damages and make sure they’re not touching each other. Here’s a quick table to remember:
| Tip | Description |
|---|---|
| Power Off | Disconnect the battery before starting. |
| Inspect Wires | Check for any damage or frays! |
| Keep It Dry | Wet wires are not happy wires! |
Remember, safety is the best policy. Plus, you want your scooter’s wiring drama to stay on screen, not in your garage!
Testing Your Wiring Setup
Methods to test connections and battery voltage. How to troubleshoot common wiring issues.
After wiring your 24v battery, it’s time to check your handiwork! Start by grabbing a multimeter—it’s like a treasure map for finding voltage. Place the probes on the battery terminals. A healthy battery will show around 24 volts. If it doesn’t, plug your ears from the “buzz” of disappointment!
Now, if your electric scooter isn’t zipping along, some detective work is needed. Examine the connections for anything loose or wonky. Here’s a quick troubleshooting table to help you:
| Issue | Solution |
|---|---|
| Battery not charging | Check connections, ensure proper polarity |
| No power when switched on | Inspect wiring for breaks or damage |
| Inconsistent performance | Test battery voltage regularly |
Remember, a little patience goes a long way! You’ve got this, super scooter mechanic!
Maintenance Tips for Optimizing Battery Performance
Best practices for battery care and longevity. Signs that indicate wiring or battery issues.
Keeping your battery in top shape helps it last longer and work better. Here are some best practices for battery care:
- Charge your battery regularly, but don’t overcharge it.
- Avoid extreme temperatures. Store it in a cool place.
- Check for loose connections or frayed wires.
- Clean the battery terminals to prevent corrosion.
Watch for signs of problems too. If your scooter runs slowly or the battery doesn’t hold a charge, there might be an issue. Acting quickly can save your battery life. Keeping an eye on your battery will help it stay strong!
What are signs of battery or wiring issues?
Signs include a weak charge, strange noises, or overheating. If the battery feels hot to touch, it’s a sign to check it. Always stay alert for these issues to improve safety and battery life.
Conclusion
In conclusion, wiring a 24v battery for your electric scooter is straightforward. You need to connect the positive to positive and negative to negative. Always double-check your connections for safety. With the right tools, you can do this cleanly and securely. Now that you understand the basics, gather your materials and start wiring! For more tips, keep exploring!
FAQs
What Are The Recommended Battery Specifications For Wiring A 2Battery In An Electric Scooter?
To wire two batteries in an electric scooter, you should use batteries that are the same type and size. Choose rechargeable lithium-ion batteries with a voltage of 24 volts. Each battery should have a similar capacity, like 10 amp-hours (Ah), to work well together. Make sure to connect them properly: positive to positive and negative to negative. This way, your scooter will run smoothly and safely!
How Do I Connect Multiple 1Batteries In Series To Create A 2System For My Electric Scooter?
To connect multiple 1-batteries in series, first, you need to line them up. Next, take a wire and connect the positive end of one battery to the negative end of the next. Keep doing this for all the batteries you have. Finally, connect the last positive and negative ends to your electric scooter. This way, you will create a stronger power system for your ride!
What Safety Precautions Should I Take When Wiring A 2Battery For My Electric Scooter?
When you wire two batteries for your electric scooter, be careful. First, wear gloves to protect your hands. Next, make sure to work in a dry area to prevent shocks. Always check that the batteries are connected the right way, with positive to positive and negative to negative. Finally, if you feel unsure, ask an adult for help.
How Can I Troubleshoot Issues If My Electric Scooter Does Not Power On After Wiring A 2Battery?
First, check if the batteries are connected correctly. Make sure the positive (+) and negative (-) wires are in the right spots. Next, look for any loose wires or connections. If everything looks good, try charging the batteries for a few hours. If it still doesn’t work, ask an adult for help.
What Type Of Connectors And Wiring Gauge Should I Use For A 2Battery Setup In An Electric Scooter?
For a two-battery setup in your electric scooter, you should use connectors that are strong and safe, like Anderson connectors or XT60 connectors. These help join the batteries to the scooter’s system. For wiring, use 10 or 12-gauge wires. These wires are thick enough to carry energy without getting hot. Always make sure the connectors and wires can handle the power your scooter needs.