Have you ever wondered how a golf cart runs so smoothly? It’s all about the batteries and how they connect to each other. A wiring diagram for golf cart batteries shows this important setup. Knowing how the batteries connect can make a big difference. It helps you keep your cart in shape and running well.
Imagine you’re playing a round of golf. The sun is shining, and you’re riding in your cart. Suddenly, it slows down. What went wrong? Often, it’s all about how the batteries are wired. If you have a wiring diagram, you can easily spot problems.
Many people think wiring diagrams are too complicated. But they really aren’t! With the right guide, anyone can learn how to read them. Plus, understanding this diagram can help you save money on repairs.
Next time you check your golf cart, take a look at the wiring diagram for your batteries. It might surprise you how much you can learn! This knowledge can keep your golf adventures fun and worry-free.
Wiring Diagram For Golf Cart Batteries: A Complete Guide
Wiring Diagram for Golf Cart Batteries
Understanding a wiring diagram for golf cart batteries can make maintenance easier. A clear diagram helps you know how to connect the batteries correctly. Did you know that improper wiring can lead to damage? With a good diagram, you can avoid costly mistakes. It shows the positive and negative connections clearly. This way, you can keep your golf cart running smoothly and safely. Isn’t it amazing how a simple diagram can save you time and trouble?Importance of Wiring Diagrams
Explanation of how wiring diagrams facilitate maintenance and repairs. Benefits of using a wiring diagram for troubleshooting electrical issues.Wiring diagrams are like treasure maps for your golf cart. They show where everything goes, making maintenance easier than finding the last cookie in the jar! With a clear diagram, you tackle repairs quickly, saving time and a few extra grey hairs. If something goes “zing,” the diagram helps you troubleshoot like a pro. You can spot problems fast and know which wires to check first. Remember, a wiring diagram is not just a piece of paper; it’s your golf cart’s best friend!
| Benefits of Using Wiring Diagrams | How They Help |
|---|---|
| Easy Maintenance | Shows where each wire goes. |
| Quick Troubleshooting | Helps find problems fast. |
| Less Stress | Reduces confusion about wiring! |
Using a wiring diagram means more fun on the course and fewer worries. Let’s be honest, wouldn’t you rather be golfing than fixing?
Basic Components of a Golf Cart Wiring System
Key parts: batteries, cables, and connectors. Importance of proper connections and configurations.A golf cart’s wiring system has three key parts: batteries, cables, and connectors. Each component plays a vital role. Batteries store energy, cables carry the juice, and connectors keep everything snug. If one part is loose or mismatched, it’s like trying to play golf with a flat tire—definitely not ideal! Proper connections and configurations ensure your cart runs smoothly. Here’s a quick look at these parts:
| Component | Function |
|---|---|
| Batteries | Store electrical energy |
| Cables | Transmit electricity |
| Connectors | Link components together |
Interpreting a Wiring Diagram
Explanation of symbols and notations used in wiring diagrams. Stepbystep guide to reading a simple wiring diagram.Reading a wiring diagram can feel like deciphering a secret code! But don’t worry, it’s easier than you think. Start by spotting symbols; these little guys show you the parts, like batteries and switches. A line between them? That means they connect! Here’s a fun tip: think of it like a treasure map; each symbol leads you to the right connection! Follow this simple guide:
| Step | Description |
|---|---|
| 1 | Identify all symbols |
| 2 | Check connections between components |
| 3 | Trace the path from start to finish |
And there you have it! With a little patience, you’ll be a wiring wizard. Just remember, every great golf cart needs its batteries connected correctly to cruise around the course!
Creating a Custom Wiring Diagram
Tools and materials needed for designing a wiring diagram. Tips for mapping out the wiring layout specific to your golf cart model.To create a custom wiring diagram, grab a few tools first. You need a wire stripper, a screwdriver, some electrical tape, and maybe a snack to keep your energy up! Next, think about your golf cart’s model. Mapping the wiring layout correctly can save you a handful of future headaches. Use a pencil and paper to sketch out your ideas. Remember, it’s like playing Tetris, but with wires!
| Tools | Purpose |
|---|---|
| Wire Stripper | To remove insulation from wires |
| Screwdriver | To tighten or loosen connections |
| Electrical Tape | To secure and protect wiring |
Comparative Analysis of Wiring Diagrams for Different Golf Cart Brands
Brief comparison of wiring diagrams for popular golf cart brands (e.g., Club Car, EZGO, Yamaha). Unique features and considerations for each brand’s wiring layout.Golf cart brands like Club Car, EZGO, and Yamaha have unique wiring diagrams that help owners. Each brand uses different layouts. Here’s a quick look:
- Club Car: These diagrams often show multiple battery connections. They have a clear grouping and colors make it easy to follow.
- EZGO: They use simple, fewer wires, which makes troubleshooting easy. The layout is compact for saving space.
- Yamaha: Their diagrams include special features for charging. They often have extra parts like fuses or switches.
Choosing a wiring layout depends on what you need. Always follow the specific diagram for your cart brand.
What should I consider when using a wiring diagram for golf carts?
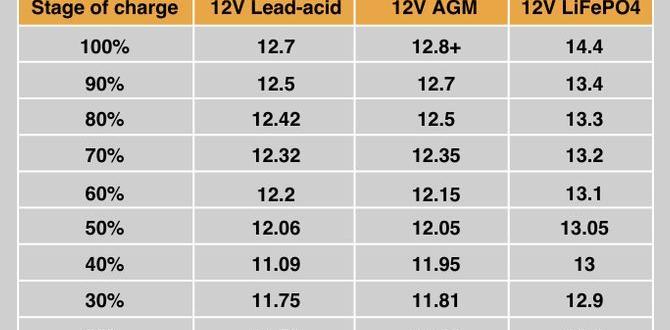
Check battery type, wire color codes, and connection points. Understanding these helps ensure safety and good performance. Don’t forget to wear gloves and take care while working.
Resources for Additional Help
Recommended websites, forums, and manuals for golf cart owners. Where to find professional assistance and consultation for wiring issues.Finding the right help for golf cart battery wiring is easier than you think! Many great resources are just a click away. Check out dedicated websites like GolfCartForum.com for tips and tricks shared by fellow enthusiasts. Manuals from your cart’s manufacturer can also provide step-by-step instructions. If you’re feeling lost, don’t hesitate to seek professional help. Local repair shops often have experts ready to assist!
| Resource Type | Website/Source |
|---|---|
| Forums | GolfCartForum.com |
| Manufacturer Manuals | Your Cart Brand |
| Professional Help | Local Repair Shops |
Conclusion
In conclusion, a wiring diagram for golf cart batteries is essential for safe connections. It shows how to connect the batteries correctly, helping you avoid shorts and damage. By understanding this diagram, you can maintain your golf cart better. Don’t hesitate to check out more guides or diagrams online for clearer instructions. Happy golfing!FAQs
What Is The Proper Wiring Configuration For Connecting Multiple Batteries In A 36-Volt Golf Cart System?To connect multiple batteries for a 36-volt golf cart, you will need three 12-volt batteries. Connect the positive (+) side of the first battery to the negative (−) side of the second battery. Then, connect the positive (+) side of the second battery to the negative (−) side of the third battery. Finally, the positive (+) side of the third battery is your main positive, and the negative (−) side of the first battery is your main negative. This setup helps power your golf cart properly!
How Can You Identify The Positive And Negative Terminals On Golf Cart Batteries For Correct Wiring?To find the positive and negative terminals on golf cart batteries, look for labels. The positive terminal usually has a “+” sign, while the negative has a “−” sign. You might also see colors: red for positive and black for negative. Always connect the positive wire to the positive terminal first. This makes sure you don’t make a mistake!
What Are The Common Mistakes To Avoid When Wiring Batteries For A Golf Cart?When wiring batteries for a golf cart, avoid mixing different battery types. Make sure all batteries are the same size and voltage. Always connect the positive cables first, then the negative ones. Check your connections to ensure they’re tight and secure. Lastly, don’t forget to keep the wires tidy to prevent any accidents!
How Do You Troubleshoot Wiring Issues In A Golf Cart Battery System?To fix wiring problems in a golf cart battery system, first, turn off the power. Then, check all the wires and connections for breaks or loose ends. You can use a flashlight to look closely. If you find a broken wire, you may need to replace it. Finally, after fixing everything, turn the power back on and test the cart.
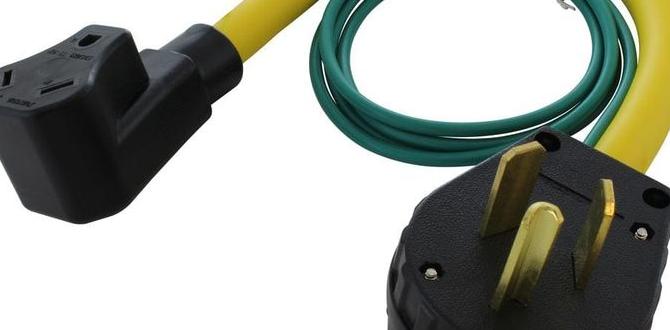
What Type Of Cable And Connectors Are Recommended For Wiring Golf Cart Batteries?For wiring golf cart batteries, you should use thick cables called 4-gauge or 6-gauge wires. These wires carry a lot of power safely. Use ring terminals to connect the cables to the batteries. This way, the connections are strong and won’t come loose. Always remember to check your work for safety!